Lia Cooper’s 10 Reasons To Love Scrivener
Scrivener is a program created by the folks at Literature & Latte for and with writers in mind. Let’s look at the Top 10 Reasons I love Scrivener and why you may love it too.
*click on any of these images to see a larger version
- Scene Construction—Scrivener rethinks how we create written documents. You’re probably familiar with how Microsoft Word (and just about every common writing program) formats documents: linearly. If you write books or short stories, you know that they are generally not one continuous scene, they’re composed of many scenes which are perhaps grouped together by chapters and further grouped by parts. Scrivener embraces this structure by turning scenes and chapters into discreet units all within the same document. Click on a scene and Scriv opens just that scene in the main view window, click on a chapter and view every scene in that chapter in a continuous scroll. This allows you to navigate through your story much more easily and quickly than you can through a Word document and lets you rearrange scenes or chapters as simply as dragging and dropping them into order.
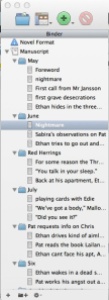

- The Binder—This feature (generally the default column on the left when you start up Scrivener) lets you organize your manuscript, characters and research. The manuscript folder is generally listed first, this is your main writing folder in the project. Underneath it you’ll find other folders for Characters, Settings, and Research notes, which allows you to easily navigate around your manuscript and between the main story and your notes.

- Project Targets (Project >> Show Project Target)—I’m a visual person and I love Project Targets in Scriv. Set the project total, give yourself a deadline (Example: November 30 if you’re doing NaNoWriMo), and set your daily word count goal. There’s nothing quite like watching that progress bar turn green to motivate you to meet your daily goal!

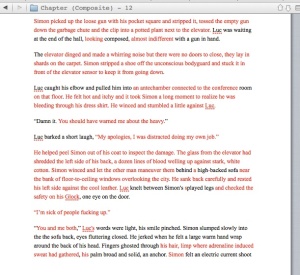
- Active Statistics Bar—This word count and page bar found at the bottom of the main view screen adjust depending on what you have opened in the main screen. So if you’ve selected the entire manuscript it will show you your total word count and then if you click on a single scene it will adjusts to show you the pages/words for just that portion of the book. As someone who often likes to regulate the ebb and flow of my word count across chapters and scene for pacing this feature saves me having to highlight portions of the story to check word counts.

- Revision Mode (Format>>Revision Mode)—I just started using this feature a couple months ago when I began working on a second draft of The Source & The Wire, which requires several extensive rewrites and a lot of tense corrections. Click the revision (my screencap shows revision in red for First Revision) and then start editing your document. Everything you change or add to the document will now show up in red so you can see and track the changes you’re making. You can also assign different revisions different colors. Once you’re satisfied with all of your revisions click Remove Revisions and everything will turn black.
- Corkboard—There are 3 primary ways to view your Scriv document: Scrivenings (this is a composite view of all the text files), Corkboard and Outliner.

The Corkboard view breaks down the parts of your story into notecards which you can arrange visually and write summaries for. This is a great feature if you are used to outlining by hand in real life.

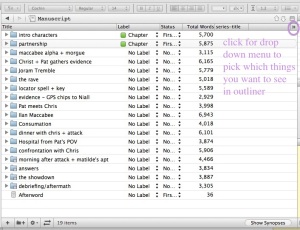
- Outliner—Outliner is another way of getting an overview of your story. You can click a drop down menu (see screencap) to pick which pieces of information you need for each chapter/scene. I usually just pick Word Count Total so that I can monitor how many words are in each chapter and in each scene within the chapters.
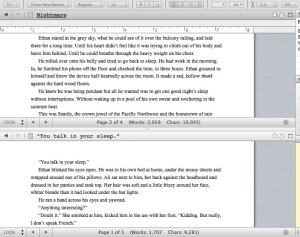
- Page/Layout View—One of the things I hate about Google Docs is how it’s one continuous document and doesn’t split things up into pages visually. I have a hard time typing into a continuous white space that fills an entire screen. Toggling page view (found in the Default Menu Buttons at the top on startup) lets me switch the main view screen to breakup my document visually into how it would look on a printed page. If this kind of view doesn’t work for you, you can leave it on its default setting.

- Split View—Have you ever needed to write a scene while referencing a different scene or conversation that appeared earlier or later in the document? In Word it’s a pain in the butt to scroll between two different portions of a document. In Scrivener you can split your screen (View >> Layout) horizontally or vertically and set each window to a different part of the manuscript (or your research) and type into either window.
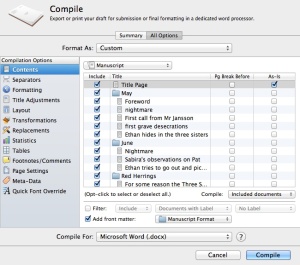
- Compile—Last, but not least, Scrivener comes with a basic built-in compile feature that lets you export your Scriv file in a number of formats. It also gives you many many options for how you what that export to look. You can use Compile to turn your document into epubs and mobi files with working table of contents, front matter, basic meta data and even covers. This is great if you want to self-publish.


These are just a few of the features in Scrivener—there are hundreds more. But I can tell you I use just about every single one of these features every single day when I’m writing or editing. Scrivener was designed with novel writing in mind and I think if you give it a shot, really embrace its scene and binder structure, you’ll realize just how powerful and intuitive it is. I would never go back to using Word or a similar program to write.
Do you use Scrivener? If so, what’s your favorite feature?
Interested in trying Scriv? Check out the free 30 day trial and let me know what you think of it!
Disclaimer: I’m not getting paid to say any of this or rec Scrivener; everything in this post is just my opinion.
5 thoughts on “Lia Cooper’s 10 Reasons To Love Scrivener”
Automatic chapter numbering – by putting each chapter in a folder named with a wildcard character, you won’t have to go back and renumber things if you add or remove a chapter. In the export options, you can set the automatically numbered chapter headings to appear in your exported document.
I like how you can export for submission to a publisher and it automatically converts your font into Courier and converts italics into underlined text, to meet submission requirements. But my favorite feature is probably snapshots. Being able to keep an older version of a text in case you want to go back to it or re-use parts of it makes things a lot easier.
Compile, like I say in the blogpost, is a huge part of what convinced me Scriv was worth purchasing. It is so much simpler (at least for me) than using Calibre or Sigil (both of which are not 100% up to date anymore) and it’s quite powerful for putting out files exactly the way you need them for submissions.
Snapshots is one of those amazing features I need to dig into and try using more. Usually I take a snapshot before I enter revision mode just in case. My writing partner is very religious about taking daily snapshots of her work though. It makes recovery so much easier if something happens to your files.
Comments are closed.